Introducing coBib
coBib is a console-based bibliography manager written in Python.
I started developing it a little more than a year ago in the need of a more simplistic and easy-to-use alternative to Mendeley, Zotero and the like.
But most importantly I was looking for a tool to move one more important piece of my workflow into a more comfortable and cozy setting: my terminal! ![]()
Over the past year a few major design features have crystallized out which include:
Plain Text Storage
The redesign to use a YAML-based plain text database for storage instead of the sqlite3 database in the early proof-of-concept has become an important aspect to me. Not only is it human-readable but it can also be tracked easily with version control and ensures independence of the previous two features with respect to the file format and tool to read it in.
Terminal User Interface
Another major change was the introduction of a simple curses-based TUI which is currently in the beta stage of development: v2.0.0b4.
This was an important change since I had realized that handling increasingly large literature database meant a manual and tedious parsing of long stdout outputs to the terminal.
The new TUI simplifies this process through an initial loading of the database into the program allowing subsequently instantaneous operations.
It was important to me that the TUI supports all operations that are available on the command line in a meaningful fashion. In the following I would like to introduce a simple workflow with coBib.
Working with coBib
Setup
Before doing anything, you have to run cobib init which will initialize the database file.
After this single step, you are good to go!
Using the TUI
When you simply run cobib without any subcommand you will be greeted with the initial screen of the TUI which lists all entries in your database.
Obviously, when you run this for the first time, this list is most likely empty.
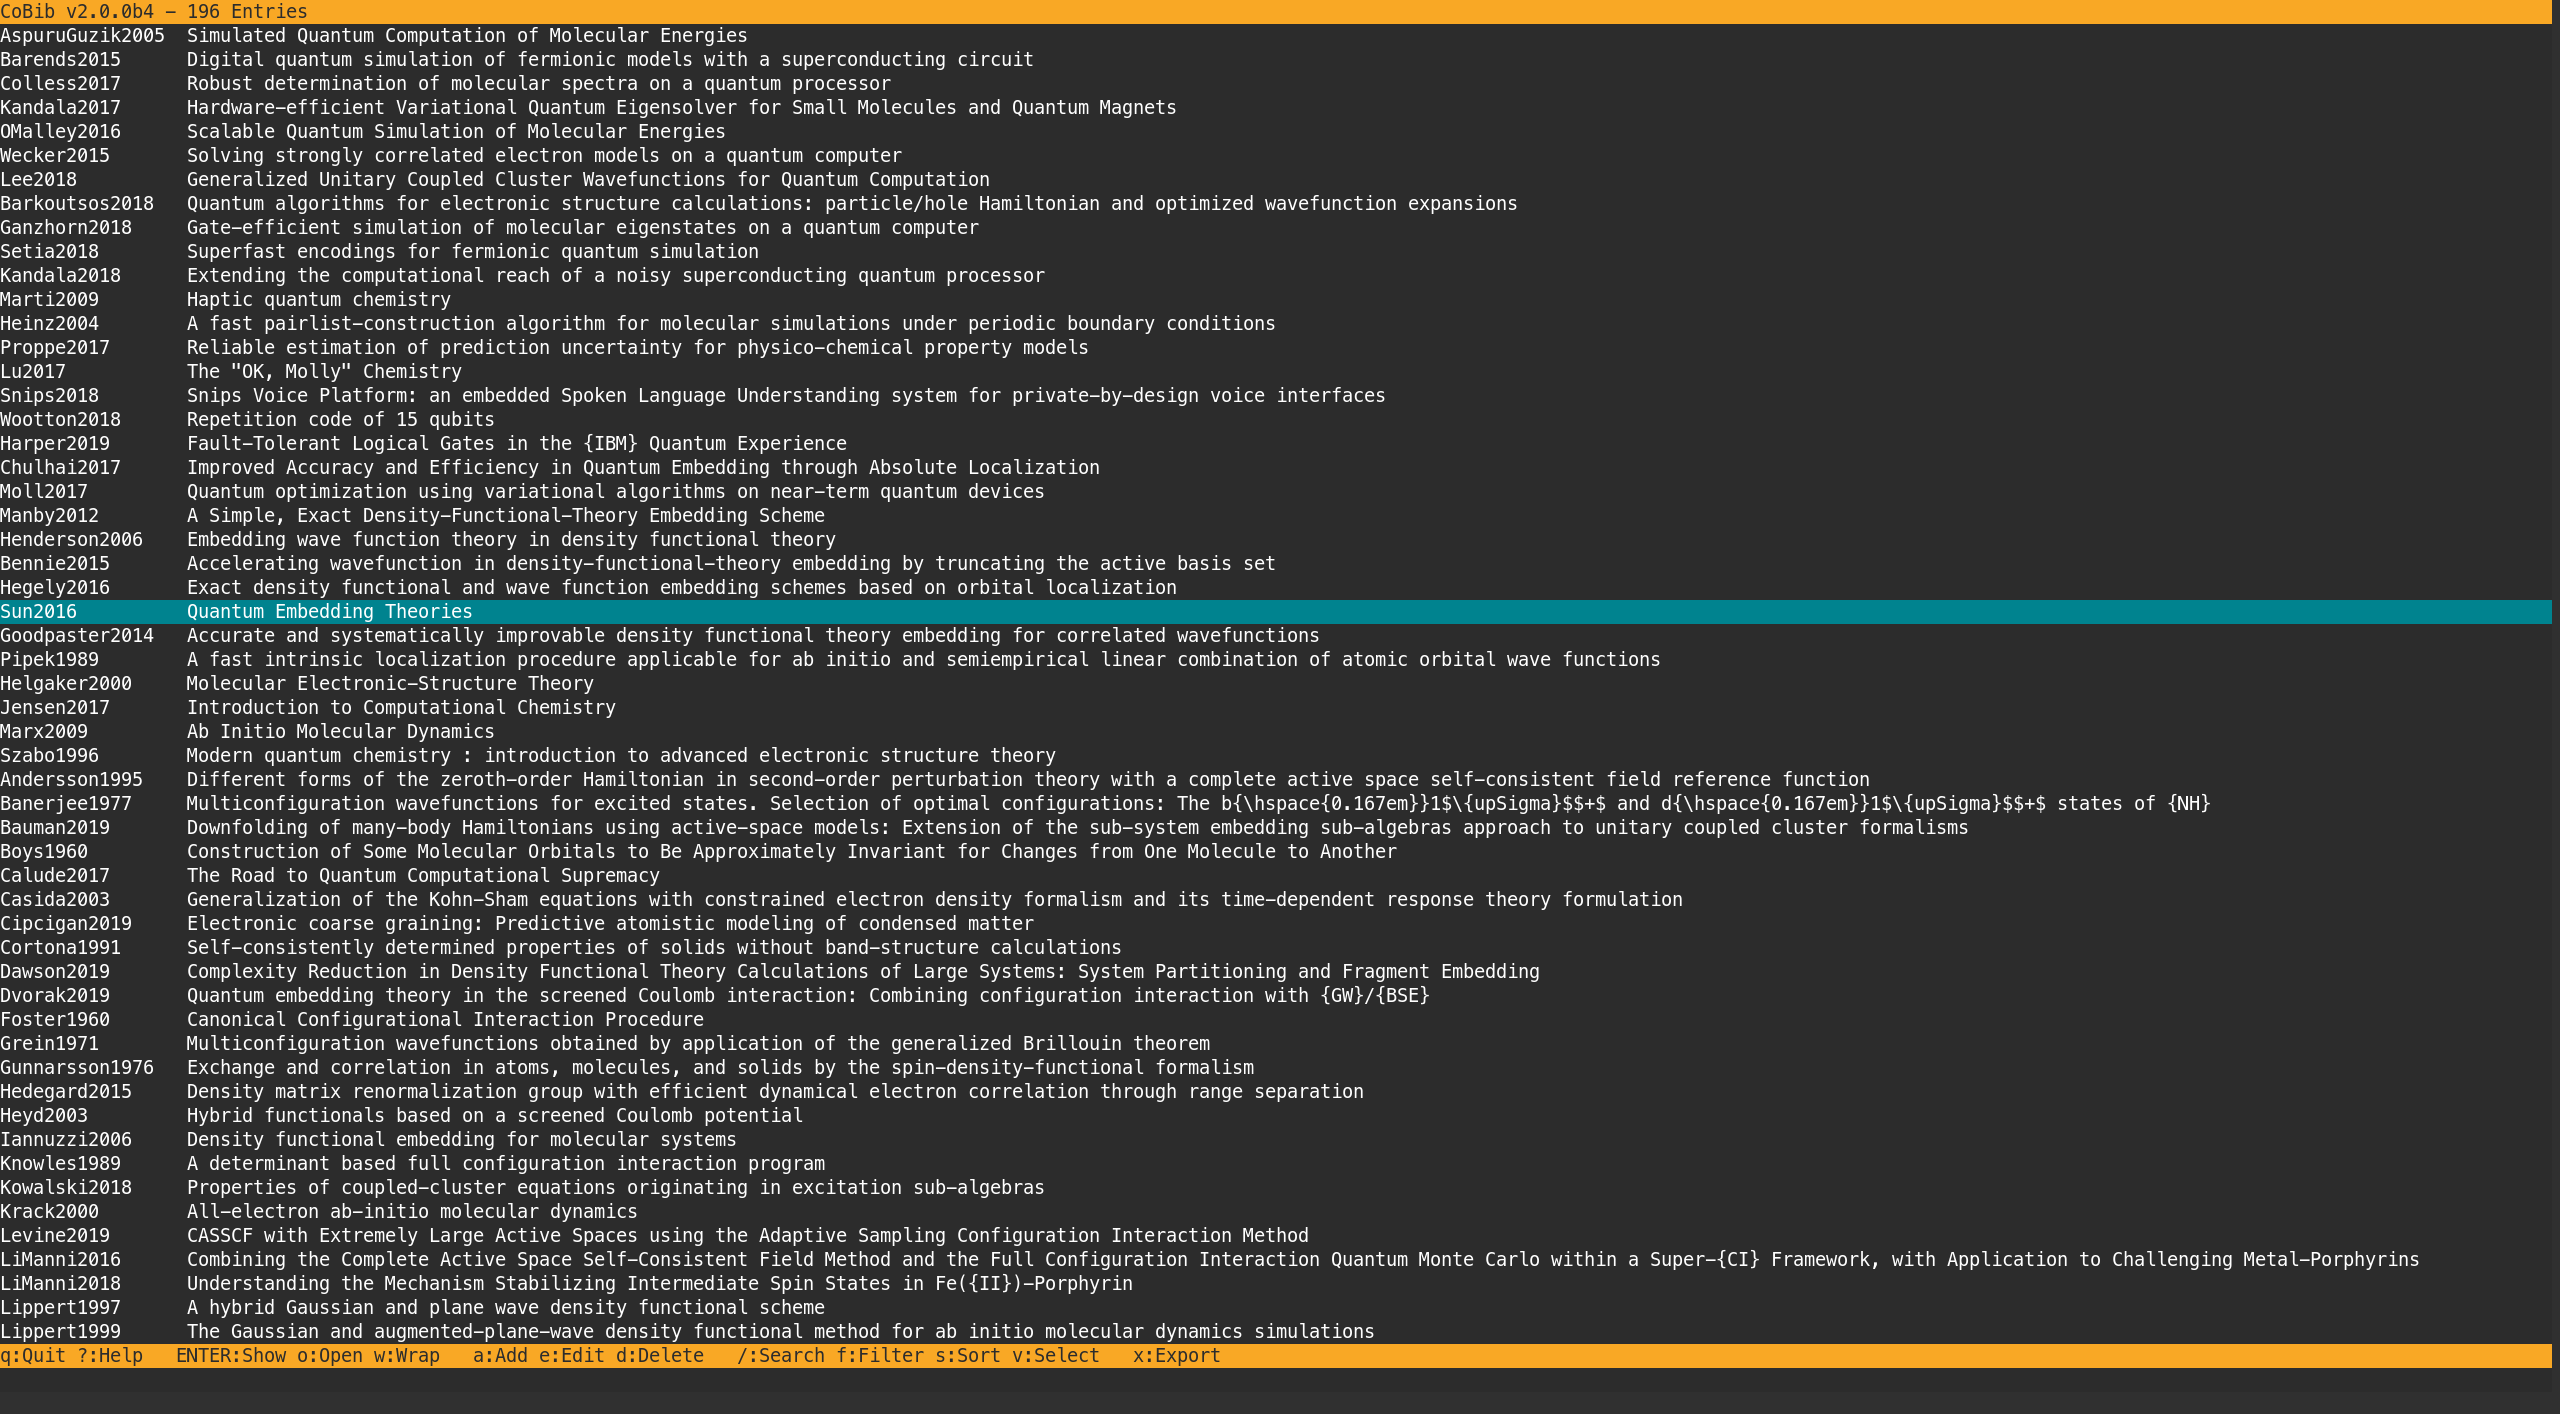
There are a few things going on here:
- You can see two status lines: one at the top; and one at the bottom.
- The top one includes coBib’s version information as well as some statistics on your database.
- The bottom one provides a quick overview of the default key bindings of the most import operations.
- In between the two status lines, you are presented with a scrollable buffer listing your database entries.
- You can navigate this buffer with Vim-like bindings of
h,j,kandl, but the arrow keys also work if you prefer that. -
gandGallow you to quickly jump to the beginning and end of the buffer, respectively. - You can quit the buffer with
q.
- You can navigate this buffer with Vim-like bindings of
On startup, the entry list contains the same information as the result of cobib list -l (by default, that is).
Thus, it presents to you a two-column table with the IDs and titles of your database entries.
Adding, Editing and Deleting Entries
You can add (a), edit (e) and delete (d) entries by pressing their respective keys.
Add
This command opens the command prompt below the bottom status line and populates it with :add .
Here, you have the full functionality of the command line interface at your hands.
This means you can add new entries to your database by providing DOIs, arXiv IDs or even bibtex files.
You can also provide custom labels, files and tags.
For more information refer to the man page or try cobib add --help.
Edit
This command will open the YAML-representation of the currently selected entry of the buffer in your favorite text editor (as specified by $EDITOR).
Here, you get full control over the contents of that entry, so be mindful of your edits!
Delete
This command will delete the currently selected entry of the buffer.
There is no safety net, so unless you have a backup of your database, this can lead to permanent data loss!
Viewing Entries
Now, that you actually have some entries in your database, it is definitely of interest on how to view these!
Show
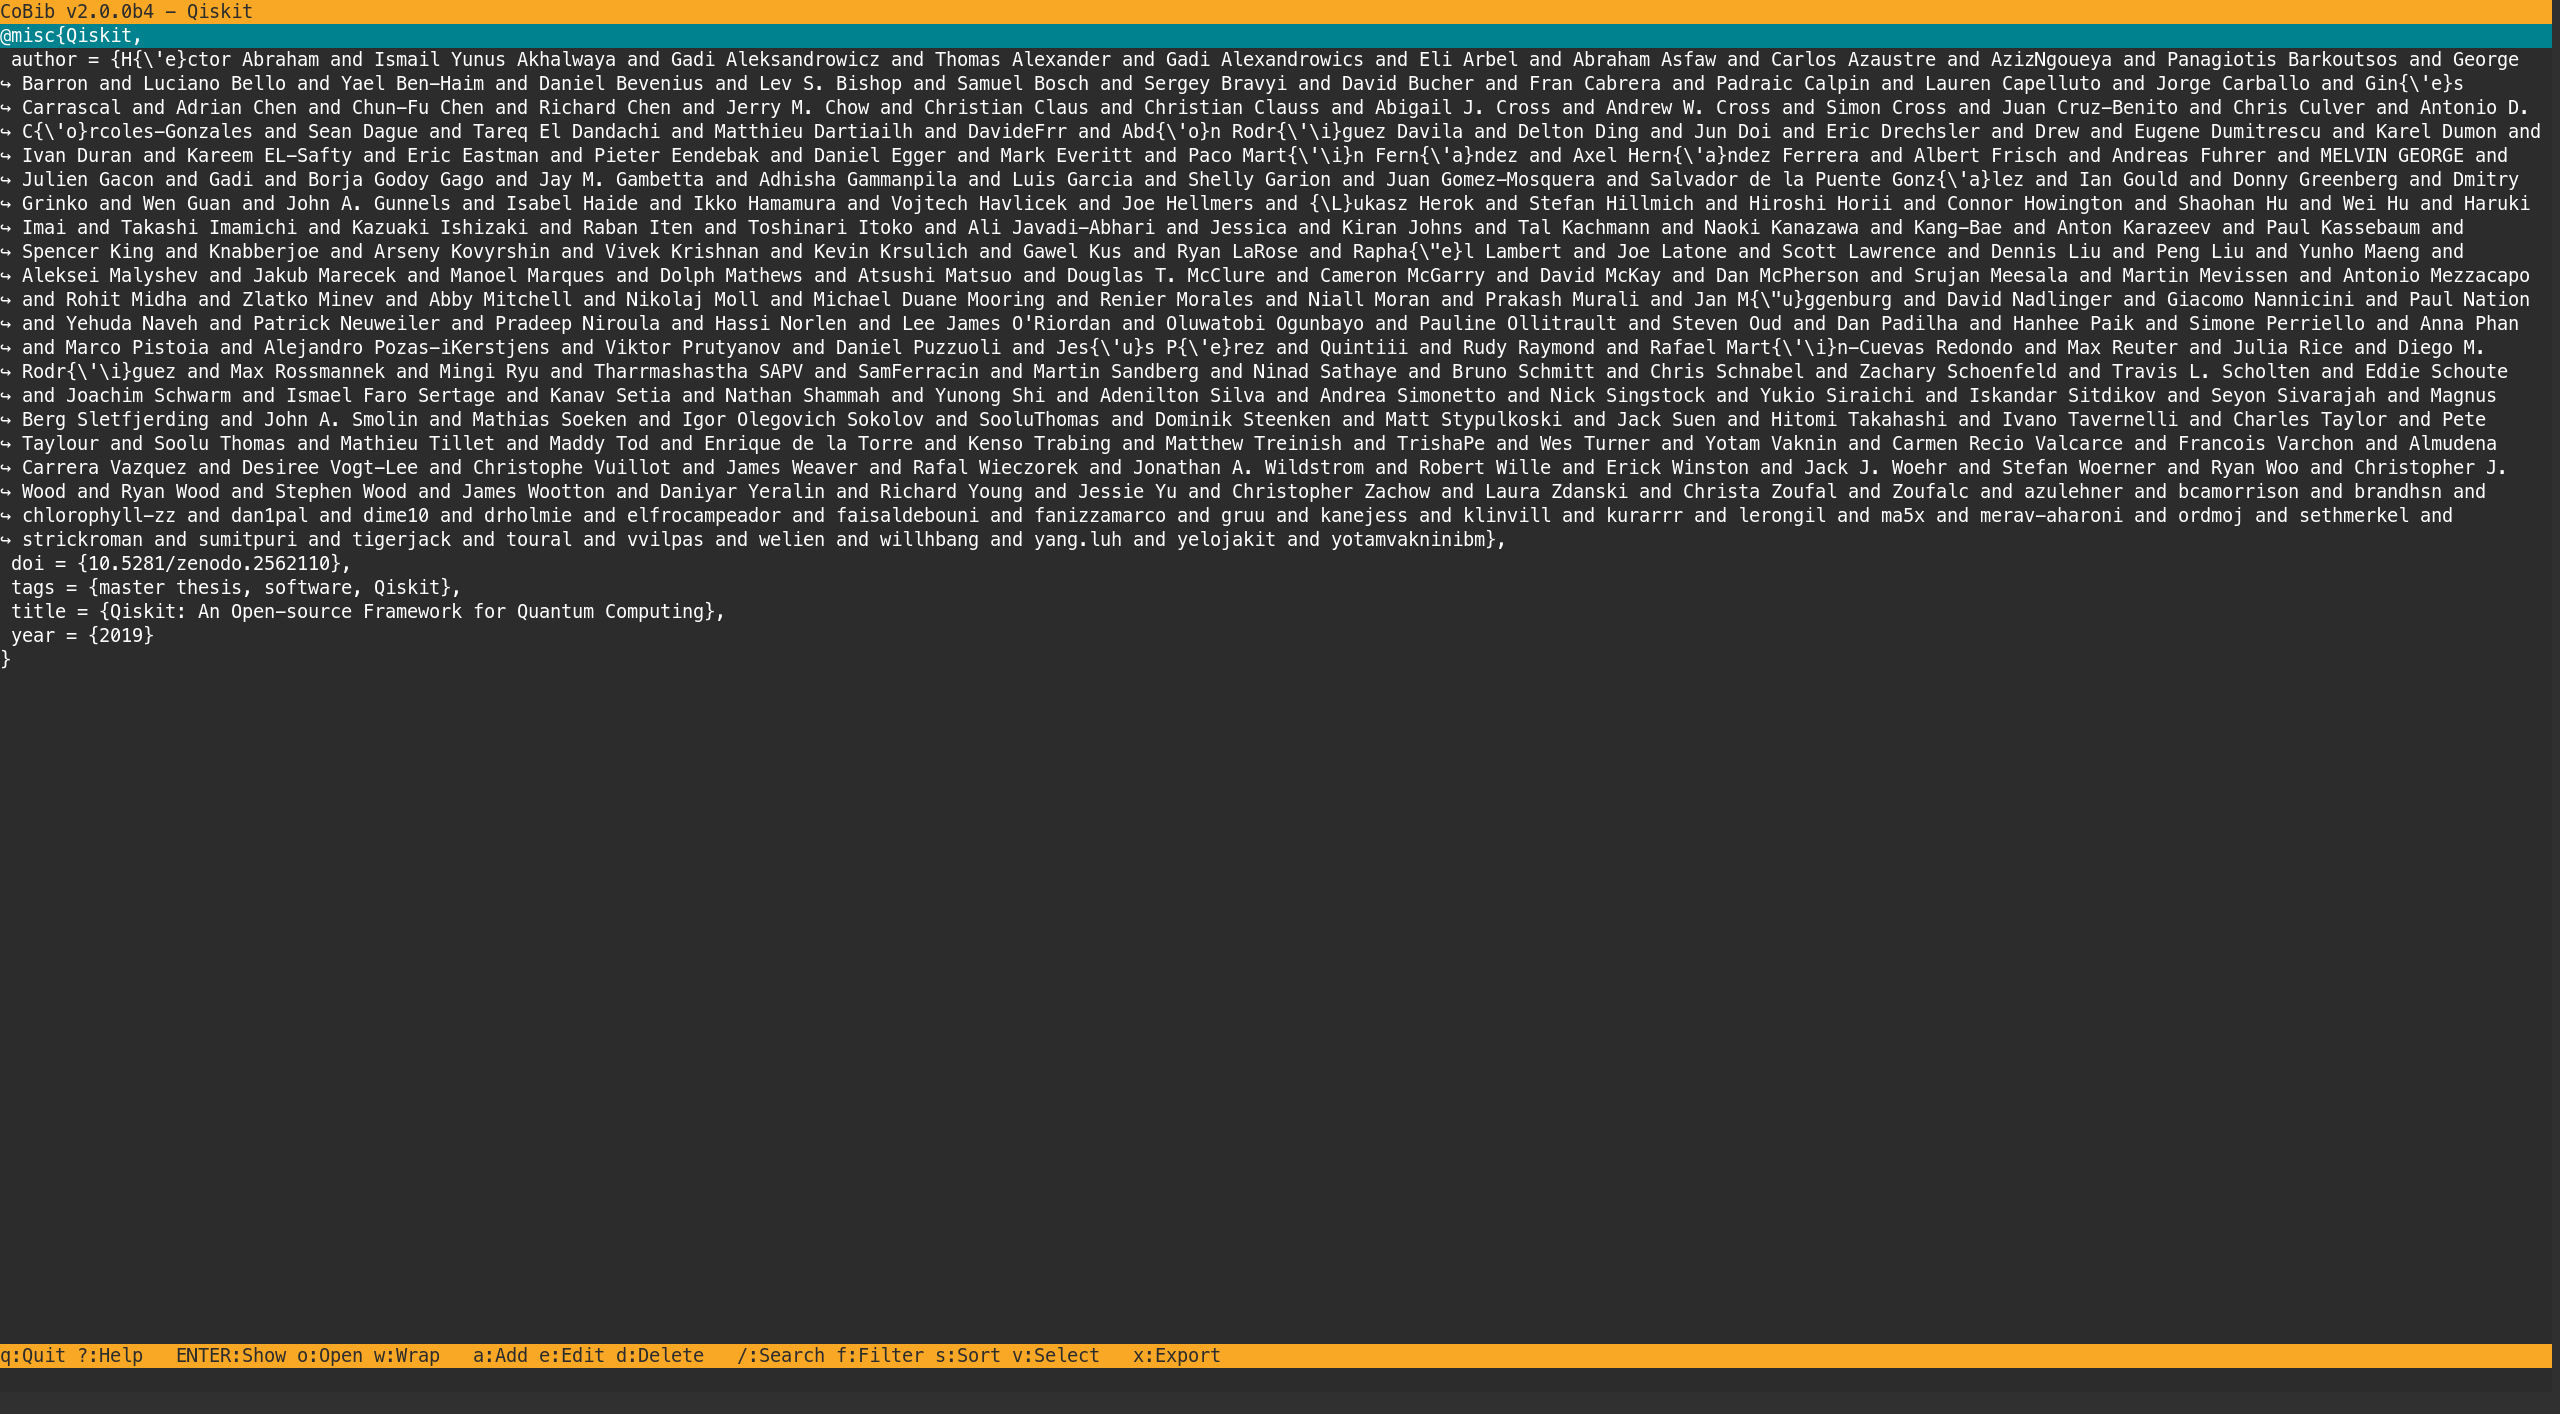
This command is triggered when you hit Enter or Return.
It will replace the contents of the buffer with the bibtex representation of the selected entry.
Once again, you can scroll and quit this buffer as before.
Wrap
The wrap command can come in handy especially in this show buffer when your database contains the complete abstracts of your references but it is also available in the normal (the list buffer) which comes in handy when starting coBib in a rather narrow terminal window.
By pressing w you can toggle line wrapping: i.e. whether lines continue beyond the right edge of your window and are only visible through scrolling or whether they get wrapped to continue on the next line with a visual indent.
Open
One more command is available through o which will open any associated item of the entry’s file field.
This is achieved through xdg-open and open on Linux and Mac OS, respectively.
If no item is associated with the selected entry, an error is shown in the command prompt at the bottom of the window.
Filtering the list
Especially when your database becomes very large, being able to narrow the listed entries down through filters is an important function.
I will not go into the technical details of the filtering mechanics in too much detail here and instead try to explain the gist of it with some examples.
For more information, please take a look at the man page or try cobib list --help.
Filter
When pressing f you are placed into the command prompt at the bottom of the window.
There you can add filters to the list query to narrow down the entries to be presented in the buffer above.
The filter mechanics are most easily explained with an example:
1

:list ++title Qiskit
This will list only those entries whose title field contains the word “Qiskit”.
You can also invert this filter and list only those entries which do not contain the word by typing:
1

:list --title Qiskit
As you can see, keywords with ++ prefixed represent positively matching filters, while those prefixed with -- must negatively match.
For filters you may use any name for a field present in your database.
Thus, in the above example, title could be replaced by any word describing such a field.
Common examples include author, year, tags, etc.
For a complete list of the available filters of your specific database you can run cobib list --help.
There is one more important aspect to filters: combinations! You can combine any number of filters as you please, e.g.
1

:list ++author Bravyi --author Kitaev
will list all entries which have “Bravyi” as their author but not “Kitaev”.
Thus, multiple filters are combined with logical ANDs.
If you would rather combine all filters with logical ORs, you can add -x or --or as an argument to your list query.
If you want to remove a filter from your query to expand the number of listed entries, you can press
fonce more and edit the filters in the command prompt.
Sorting
Filtering entries would only be half as useful if you could not sort the resulting list.
This is what the sort (s) command is for.
Again, an example will speak for itself:
1

:list -s year
This will sort the list of entries by year.
You can reverse the sorting order by adding the argument -r or --reverse to your list query.
sonce more.
Export
Finally, the export (x) command allows exporting your database to bibtex format or even a zip file which will include all associated file items.
You can even combine the filters described above with the export command to selectively export a subset of your database!
1

:export -b 2020.bib -- ++year 2020
In the example above the -- marks the separation of the arguments of the export and the list command.
You can find detailed information on how this command works in the man page or with cobib export --help.
Outlook
I hope you enjoyed this short introduction to cOBib and find it to be a useful tool and welcome addition to your terminal workflow! ![]()
Amongst minor improvements to make some of the interactions smoother I have planned several larger ideas which I want to implement for future releases ![]()
- implement a
searchcommand which should complement the filtering mechanism described earlier to allow field-independent search. This could also be extended to nested searching of associated PDF files. - implement a
selectcommand allowing to visually select multiple entries to operate on. Obviously, this will be solely a TUI feature.
Resources
You can find more information on everything covered here as well as configuration options and more at:
- the man page:
man cobib - the integrated help:
cobib --helpandcobib <subcommand> --help - the Gitlab repository
- the issue tracker